Step by Step Guide for Creating free blogspot websites 2016
It is time to get your new ideas and business online. In this guide, I'll give you a step by step approach images included), on how to create your free hosted website, using .blogspot.com. You don't need to spend a penny, in order to own a blog. Google will host your blog for you, and since Google, you need no worries, on downtime, or security threats. This guide will help you to create a free website on blogspot, you need not to buy domain and hosting services.
About Blogspot.com
Blogspot is a platform which allows you to build and host website for free, it is owned by Google, so you do not have to worry about server down time and other issues. It is simple to set up, and if you follow my guide carefully, your website should be online in less than 30 minutes. The good part of blogspot.com is, even though you have no coding knowledge, you can still make your blog looking greatly designed, there are thousands of free blogger templates which you can use to give a professional look to your website. So, let get started.
Step by Step Guide for Creating free blogspot websites 2016
Step 0: Get A Gmail Account First

Step 1: Login to Blogger

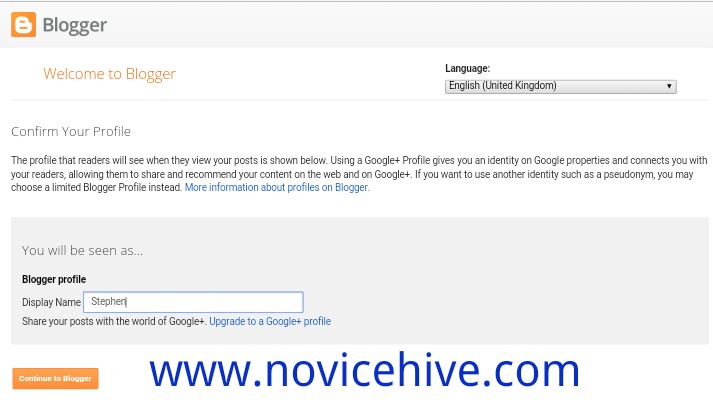
Step 2: Continue To Blogger.com
Step 3: Create a New Blog

Step 4: Provide Website’s domain name and title for your blog
In this step, Blogger will need you, to provide the title and address of your website. The Title is the name of your
 website, while the address is the link to your website. For me, Novice Hive, is the title of my website, while www.novicehive.com, is my address. But remember, my address is customized already, (Read my post on how to customize your blogspot address). So for example, if you want to build a website on fashion talks, then the title of your website could be Latest Fashion, or Fashion Talk, while your address could be latestfashion.blogspot.com, or fashiontalk.blogspot.com, as in the image above. Since these domain names are free, they would be suffixed with blogspot.com by default. Blogspot, also provides us the option of having custom domain names and we would see how to add custom domain names in other tutorials, remember to always use our search button, to find what you want.

Note that the domain name must be unique so there are chances that the domain name you wanna choose is already registered.
In that case you must need to try a different domain name until the blue tick, appears at
the right side of Address field as shown in this image. Once it’s done, choose a template, (you can choose any template at this point, you would be able to change it later at any point of time, we will show you how to do that) and click Create Blog!
Congratulations, Your free website is now running.


That is all, your new blog is live, and running. You could start publishing articles on your blog already but, hold a little. Before you start writing articles on your blog, ensure you read through my new tutorial, on how to properly, customize your new blog for a better, and professional look. In the article, I'll also explain bit by bit, the meaning of your admin panel, and what each segment of your admin panel, on blogger.com means. As for my tutorials, I try to be as simple as popossib, however, if there are areas you need to clear your head, use the comment section below. Thanks.

Comments
Post a Comment